
It is that time of the year again when everyone on Facebook is talking about all the delicious Girl Scouts cookies they are selling, buying, and eating, and here I am, stuck in the UK, with none. I got lucky last spring, when one of my friends sent me an amazing Easter box full of delicious treats including two boxes of cookies (which my lovely dog ate one of ..) but this year neither us were that lucky, and I was sad.

That is.. til I stumbled upon a recipe for homemade Samoas. Usually I might scoff at the idea of spending hours in the kitchen slaving away over something I could buy (that would be easier, and probably cheaper!). But as we can't buy them here, I figured I might as well try out the recipe.

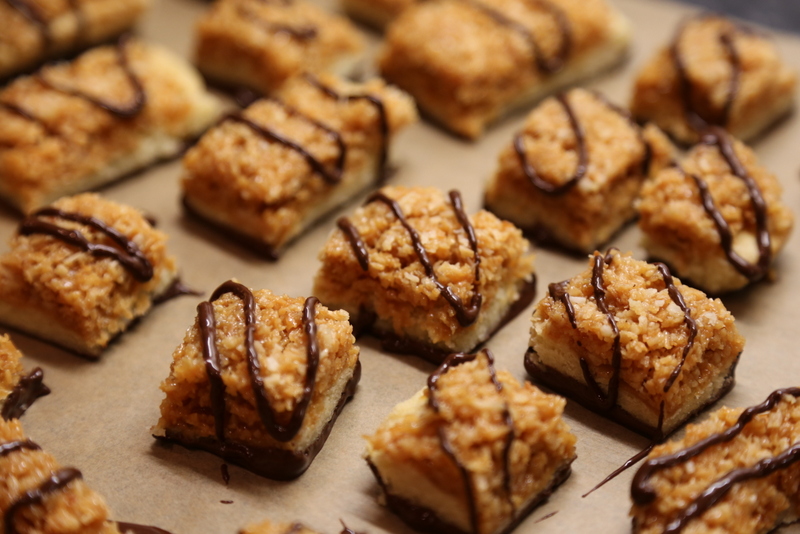
I made half of the batch into the original "donut" shape, then made half into little rectangles to save on energy. Making the original shape definitely requires a labor of love and lots of tedious time in the kitchen. But it turns out if you are willing to accept rectangular Samaos, the recipe is surprisingly easy, and amazingly delicious! They taste just like Samoas, and maybe even better. My only complaint might be that the recipe is TOO easy, and thus I've made two batches this week, and need to start running again.

 |
 |
 |
 |
 |
 |
 |
 |
Homemade Samoas Girl Scout Cookies
Prep Time: 2
hours (includes chilling)
Cook Time: 15
minutes
For the cookies:
113 g of butter (1
stick) at room temperature
¼ cup sugar
¼ tsp baking powder
¼ tsp salt
1 cup flour
1or 2 tsp milk
¼ tsp vanilla
extract
Make the cookies:
1. In a large bowl cream together butter and
sugar till fluffy.
2. Mix in baking powder, salt, and half of
flour. Then add in the rest of the flour
and mix well, scraping down the bowl as needed.
3. Add one tsp of milk and vanilla and blend
until combined and dough begins to clump together. If it seems to dry, add additional tsp of
milk.
4. Shape dough into a disk, wrap in plastic wrap,
and chill for 30 minutes to an hour. (You may want to toast the coconut while
this is chilling).
5.
When ready to bake, preheat oven to 350 f or
176c. Roll out chilled dough (between a
layer of parchment paper and seran wrap) into ½ inch thick rectangle. Place dough, on parchment paper, onto a
cookie sheet, and bake for 14-16 minutes. Rotate cookies half way through,
until the edges are pale golden brown, then cool on a wire rack.
Note:
At ½ inch thick, my dough rolled into about a 9x9 rectangle. However my “9x9” pyrex pan is actually only
about 8x8 in the bottom, which makes the cookies a little thicker than I wanted
them. But if you prefer, you can press
the dough into a 9x9 lined with parchment paper to bake in.
For the coconut topping:
1 1/2 cups shredded sweetened coconut (US) or dessicated coconut in the UK
1/2 cup granulated sugar
56g or ½ a stick unsalted butter (or salted, but then ease up on the sea salt)
Heaped 1/4 teaspoon flaky sea salt (or 1/8 teaspoon table salt, more to taste)
3 tablespoons heavy cream (US) or whipping cream (UK)
(Alternatively
you can melt 7 ounces of soft caramels, if you don’t wish to make your own,
but it is not too hard to make and doesn’t even require a thermometer!!)
Toast the coconut:
Preheat oven to
350f or 176c
Spread the coconut flakes on a
baking sheet lined with parchment paper and bake for 8 minutes, stirring
frequently (about every 2 minutes) to prevent burning. Remove from the oven, and place in a medium
bowl for later.
Make the caramel:
1. In a medium dry sauce pan over
medium high heat, melt the sugar. I
usually agitate it just by swishing around the pot, this takes about 5 minutes
for it to fully melt. Once it is mostly
melted, you may aid with a spoon to break up any clumps if needed. If the pot is not high quality, watch it
carefully and mix it around (shake the pot) to keep the caramel even, and to
prevent patches from burning. Once it is
melted it will be a dark copper color (see picture).
2. Remove from heat and stir in
butter, then add cream and salt and return to medium-high heat. Note it will look separated but this is fine,
it comes together once it boils. Stir
and bring it back to a boil, then continue to cook it a few more minutes till
it’s a little darker in color (I cooked it about 3 minutes at the boil). It should look like a lovely thick caramel
now!
3. Pour ¾ of the caramel into the
coconut mixture, and stir it with a wooden spoon. Pour the remaining ¼ onto the shortbread and
rapidly spread it to cover all the surfaces - this part will cool fast, so
spread right away. (Do not scrape the
bottom of your pot! This caramel tends to be burnt and bitter)
4. Press the caramel/coconut
mixture onto the shortbread, and let it cool.
Assembly:
8
ounces of chocolate - whatever kind you like eating.
1. Using a sharp large knife, cut up the cookies as
desired.
2. Melt the chocolate in a double boiler until its smooth
(don’t burn!).
3. Dip the bottom of each cookie into the chocolate, then
place on a sheet of parchment paper.
4. Place remaining chocolate into a zip lock bag, cut off
small corner, then pipe diagonal pretty lines across your cookies. (make sure no cookie crumbs get in your zip
lock, or they will block the piping hole)
5.
Either chill in the fridge to harden the chocolate, or
let sit out overnight.
NOTE:
if you have extra coconut/caramel, miniature bon bons are delicious! I made little balls of them, then dipped the
bottom in chocolate. Yum.
If you do want to make the Samoa shape, roll your dough out to 1/2 thickness, then use a 2inch and 1 inch round cookie cutter to make the cookies. Bake for 8-10 minutes till the edges are slightly golden. When the caramel is ready, pour 1/4 of it into a parchment lined bowl, and the rest into the coconut. Now spread caramel onto each Samoa cookie (watch out, its hot!), then press coconut on top of it.
Dip bottom in chocolate and drizzle chocolate on top, as specified above.
No comments:
Post a Comment